How to Inspect a Door Opening Before Finish Work
A door-opening inspection helps you catch alignment, clearance, and finish issues before they are concealed, so the right trade can address them in sequence.
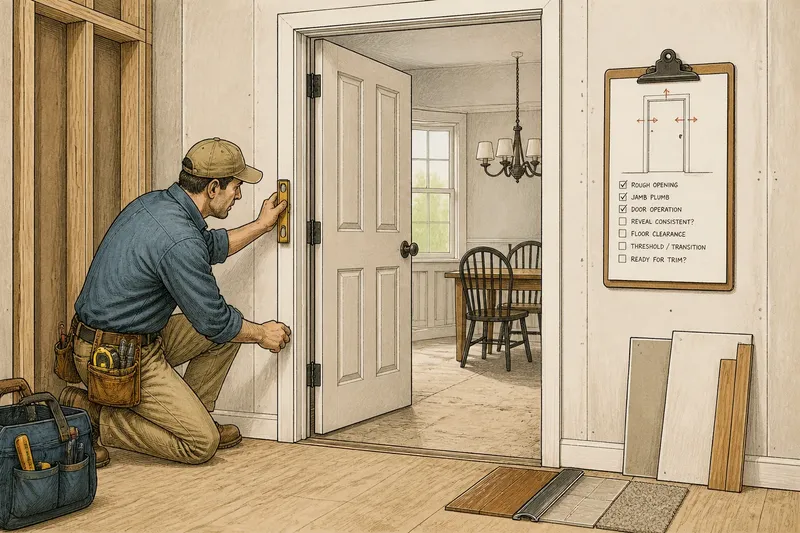
The most common mistake in a door-opening inspection is treating the frame as a finished object before checking how it meets the wall and floor. That can leave an out-of-plumb jamb, inconsistent gaps, or a poorly coordinated finish concealed until later work makes correction more difficult. Read the opening as an assembly: framing, jamb, door, casing, adjacent surfaces, and threshold each have a place in the construction sequence.
Imagine a hypothetical renovation with a newly framed dining-room opening, a prehung interior door, drywall ready for finishing, and flooring not yet installed. The carpenter hangs the unit, but the owner notices that the reveal looks wider at the top on one side. That observation does not establish the cause. It gives the carpenter a specific condition to check before casing and paint obscure the relationship.
Inspect the rough opening before the door unit goes in
The rough opening is the framed space that receives the jamb or prehung unit. Before installation, the carpenter checks the framing for sound attachment and a workable fit, while also confirming the opening’s planned location and orientation against the drawings or field layout. The required clearance depends on the door unit and project specifications, so use the manufacturer’s instructions and the construction documents rather than assuming a universal dimension.
Check for framing that is visibly bowed, loose, or obstructed, and confirm which side is the hinge side and which direction the door is intended to swing. If the opening conflicts with a nearby wall, cabinet, or planned route, pause and resolve the layout with the responsible contractor before the unit is installed. Moving framing or changing a door location can affect other work, so it is not a casual finish adjustment.
Record the opening’s location and any unresolved conflict while the framing is still exposed. A clear note now is more useful than a vague concern after the wall is closed.
Check jamb position and door operation before casing
Once the unit is set, the installer checks that the jamb is plumb, level, and square enough for the door to operate as intended. The installer also checks that the jamb is appropriately aligned with the finished wall plane. Shims support the jamb at fastening points; their placement and the fastening method follow the unit instructions and project requirements.
Open and close the door through its intended swing. Look for rubbing, a latch that does not meet its strike plate, or a reveal—the visible gap between door and jamb—that changes noticeably along an edge. These conditions can have several causes, including jamb position, a twisted frame, or a door that needs adjustment. Have the installer identify the cause before trim conceals the jamb edges.
In the hypothetical dining-room renovation, the carpenter checks the hinges and jamb after noticing the uneven reveal. The jamb is adjusted before casing, and the carpenter swings the door again. The observable decision is straightforward: if the door clears the jamb and latches without binding, the work can proceed to trim; if it still rubs or the reveal remains visibly inconsistent, the installer continues diagnosing rather than covering the area.
Coordinate the opening with drywall and flooring
Door details depend on nearby work. Drywall thickness affects how the jamb meets the wall; flooring affects the clearance beneath the door and the height and fit of the threshold, if one is specified. Confirm the intended wall build-up and finished-floor layers with the relevant trades before final adjustments. A door cut or jamb change made without that information can create a mismatch.
Ask the general contractor or installer which work is expected before the door is finally trimmed or adjusted. If flooring is not in place, the team should account for the planned floor assembly using project documents and product instructions. If the floor is already installed, check the actual relationship at the opening and refer any interference to the installer rather than trimming the door without authorization.
Where different flooring materials meet, confirm that the specified transition detail fits the door and floor assembly. The flooring installer and contractor can resolve conflicts between a threshold, undercut, or transition profile before they become finish defects.
Which door-opening issues should be resolved first?
What does an uneven reveal mean?
An uneven reveal is a visible change in the gap between the door and jamb. Ask the installer to check jamb alignment, the frame, and the door’s operation before casing is installed; do not assume the gap alone identifies the cause.
When should casing be installed?
Casing generally follows confirmation that the jamb is secure, the door swings and latches properly, and the wall-edge conditions are ready for trim. Follow the project sequence and the unit instructions, and resolve operation or alignment concerns before concealing the edges.
What should be checked before flooring is finished?
Confirm the planned floor build-up, door clearance, and any threshold or transition detail with the contractor and flooring installer. If the actual floor conflicts with the door, ask the responsible trade to assess the assembly before altering the door.
Who should correct a door that binds?
The installer or carpenter responsible for the door should inspect binding and identify its cause. If the issue involves framing movement, structural work, or a conflict with other building components, raise it with the general contractor and the appropriate qualified professional.
Use a visible-condition check before trim and paint
Walk through the opening and inspect it from both rooms. Check the operation, the jamb-to-wall relationship, the planned floor clearance, and whether any gaps or damage need attention before casing and paint. For each observation, make a clear decision rather than treating every irregularity as the same repair.
- Observe whether the door rubs the jamb during its swing; if it does, pause casing and ask the installer to diagnose the cause, but if it clears, proceed with the remaining checks.
- Observe whether the door latches without forcing; if it does not, ask the installer to check the latch, strike plate, and jamb position, but if it does, record that operation is clear.
- Observe whether the reveal changes noticeably along an edge; if it does, have the carpenter check jamb alignment before trim, but if it appears consistent, continue to the wall-edge inspection.
- Observe whether the jamb meets the planned finished-wall plane; if it does not, ask the drywall or trim lead to coordinate the correction, but if it does, allow the specified casing detail to proceed.
- Observe whether the planned flooring leaves the intended door clearance; if it does not, coordinate with the flooring installer and door installer before cutting or adjusting, but if it does, proceed with the specified floor transition.
- Observe whether the frame or surrounding material is damaged or loose; if it is, document the location and notify the responsible contractor before covering it, but if it is sound, move on to finish preparation.
In the hypothetical renovation, the carpenter records the uneven reveal, adjusts the jamb, and repeats the swing and latch checks before casing. The flooring installer later confirms that the planned floor assembly clears the door, so the team proceeds with the specified transition. If that check had shown interference, the next decision would have been to coordinate the floor and door details before making a cut. These are separate checks with observable results, not a reason to change the frame or threshold for appearance alone.
Keep a clear handoff between the trades
A door opening passes through several hands. The framer establishes the rough opening; the door installer sets and adjusts the unit; drywall and flooring trades shape adjacent finished surfaces; and the trim painter completes the visible edges. The general contractor coordinates the sequence and resolves conflicts that span trades. Responsibilities vary by project, so confirm them rather than assuming a particular worker owns every correction.
Use the project drawings, product instructions, and local requirements where applicable. For work involving structural changes, fire-rated assemblies, or other regulated conditions, consult the responsible contractor or a qualified professional. A useful inspection does not prescribe an alteration from a visual impression alone; it identifies what is visible, when it can still be addressed, and which trade should decide the next move.
At a door opening, the most useful final question is not whether every edge looks identical, but whether the assembly works and its interfaces match the project intent. State the observed condition, identify what remains concealed or unfinished, and agree on the next responsible trade before the opening disappears under trim and paint.